![]() iPhone is a bundle of surprises and innovative options that has been endowed to mankind. Seriously, you will rarely see a person cribbing and complaining about it. No doubt it openly boasts about its style and cost. Well among various such unique features, one of them being ‘recording the screen’ on your iPhone. The topic falls on the same “How to screen record on iPhone and iPad”
iPhone is a bundle of surprises and innovative options that has been endowed to mankind. Seriously, you will rarely see a person cribbing and complaining about it. No doubt it openly boasts about its style and cost. Well among various such unique features, one of them being ‘recording the screen’ on your iPhone. The topic falls on the same “How to screen record on iPhone and iPad”
But recording the screen for what? It can be a short demo recording of any of your favorite live video that’s streaming online, video chat with your friends and near ones or for that matter any action that’s happening over your phone screen which you want to instantly record. This recording on iPhone can be done without installing any additional app. Moreover, there is a provision of narrating the video with narration using the microphone of your iPhone or it can be plain recording.
Apple gives its user the provision to record the iPhone screen in a hassle-free manner. Before we begin with the process of actually recording the screen, we’ll first get into the steps to enable the screen recording feature by adding it to the Control Center.
How to screen record on iPhone – iPad
- Go to the settings icon in your home screen and open the Control Center
- Go to Customize Controls
- Select the option of Screen Recoding. If it’s not visible, check out the same in the Include section.
- For your convenience, you can shift the control center by making use of the drag bars
Recording the Screen
- Open or be at the screen which you want to record

- To get the control center, swipe up or swipe down from the bottom or upper right corner of the screen respectively, depending on the version of your iPhone.
- To start recording, tap the record button. It will look like a circle with a white dot in the center.
- Wait for a count of three. The record button turns into red and the recording will start. Whatever is happening over your screen whether it be opening or closing of any app, playing any video, seeing any image, everything will be recorded. You can even close the control center, the recording won’t be stopped. The timer will be visible in red at the upper left corner of the screen.
- In case you want to stop recording, you need to select the timer being displayed and then tap Stop.
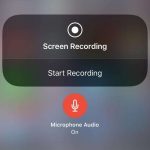
- You can also narrate the recording. For this you need to press and hold the red record button, there won’t be any countdown but the screen recording options will be displayed. The Microphone icon will be off, tap it to switch it on. Now tap on start recording. While the screen is getting recorded you can narrate and record your voice too.
All the recording made will be placed in the camera roll. Go to the photos icon on your iPhone, you’ll see them all listed recently. You can even edit your screen recordings by trimming the video clip.
Just open the required video clip from the photos app and tap on the Edit option. Right at the bottom of the screen, you’ll see arrows. You can drag the arrow either from left or right side to trim the video according to your choice, once trimmed the frame becomes yellow in color. Tap on done and select Save as a new clip. After editing the recording, the video is saved as a new file. The original video clip remains unaltered. The recorded video can be shared, mailed or you can even upload it on YouTube. If you find tough on uninstalling any apps on Apple, check this on How to Uninstall Apps on Mac? – Applications/Programs. It will help you to uninstall Built-in System Apps, Apps outside the Application folder, and General Mac Apps, which includes default screen recording App.

